Let's make this TODAY!!!!
Ok. Settle down Class. ( I have always wanted to say that...like I was a teacher...giggle)
Today is a further exploration of our painted paperbags that we started yesterday. I am sure that everyone painted them right UP!!!!
(NOT)
I have at times wanted a Lovely Ribbon, something that says "This is a SPECIAL GIFT!"
I have One trillion ribbons in my studio, but I like this idea that even the smallest bits get upcycled, have a new purpose, have another LIFE!
I paint dryer slips, save little bits of paper, and Lovely little snippy bits from my sewing and they all go into a bag. Periodically, I scrounge the studio floor for little this's and that's...You get it. I am a complete NUT CASE.
Well, what am I saving this stuff for anyway?Today I will show you.
Take that paper bag that you have handily painted.
With your Pinking Shears or whatever scissors you have, cut your bags into long strips, lengthwise.
Dip into your Lovely Snippity BITS BAG. Don't be afraid to include paper, lace bits, string, stamps, Quilting bits...You get it.
I try sometimes to coordinate colors. Sometimes I just let it happen and allow my intuitive SELF climb out and not think much about it.
There are lots of interesting things in my pile, and the idea is to Layer them together, sewn back and forth...Soothing....
Ok. (SNAP OUT OF IT)
I use a zig-zag stitch here again, in a coordinating color. The thread color matters but if you only have a few choices go with BLACK!
Start at one end and sew your foundation of long bits to the bottom. LIKE THIS:
SEE?
There are NO MISTAKES HERE...you can't make one and I love that about this ribbon...it really all looks LOVELY in the END.
It is easier to add the smallest BITs at the end. Just add from one end to the other....building a substrate that you find PRETTY!
I have used bits of old quilts and lace here.
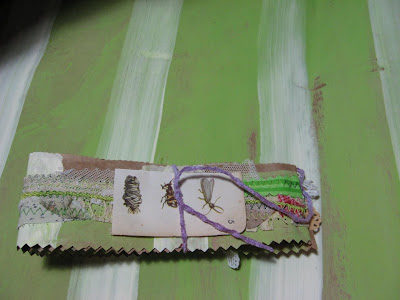
Here it is! Folded up and tied with a piece of yarn, and a scrap of an insect Book. I will add the finishing touch, a tag to write upon...VIOLA!
OK Class. That's it for TODAY! Hope you have a lovely Sunday.


10 comments:
Oh how fabulously soothing AND open ended!! No rules other than imagination!! The crud on my floor has a whole new meaning!!
HAHA! Jacquie's comment cracked me up!!
Lovely idea to piece our extras in such a creative way! The thought of 'not thinking' most definitely appeals. Wish I was abstract enough to follow through and just 'let go'. SIGH.....may be one day I'll lose my inhibitions!!
{{Hugs}}
Vicky
Well that makes my day a whole lot better! Let me know when you have a free day to come over for a cuppa tea and chat about making and doing. I love your re-use style- my Granny always said: Use it up, or wear it out. Make it do or do without!
xox,
thank you for another inspirational tut!
Calamity k
Oh My Thank You for being such a wonderful teacher! I love that there can be NO mistakes. Lovely creations you make. Joyful Bliss...
Great tute on what to do with scraps! Thanks for sharing, Valerie
THEY ARE WONDERFUL -YOUR RIBBONS my friend of the heart.
And your tutorial :LOVE IT- the way you act teacher is great-I want to be taught by you in reaL LIFE ,lol-
Thanks my dear froe sharing, your magic life with papers ,fabric,laces and what ever.
Love you-
Dorthe
Thanks Dorthe for sharing this post of FB! Wonderful, another way to use up tiny treasures!! Love this idea! Kudos Bagga!
Teacher.....I enjoyed this class !
Hugs
Susan
What a lovely tutorial and i hope to make one to .
Love ♥RINI♥
That's very cool! I too like to make gifts pop.
Post a Comment